Hey everyone!


Some of my friends know pretty well that I've picked up beekeeping as a hobby lately and am enjoying it plenty.

The news that not everyone knows and might surprise you: I have bees in my house! This probably brings up thoughts of pest removal services and infestations causing thousands of dollars of home property damage. Luckily, that's not the case - the closest comparison for my "indoor bees" is an ant farm. Several months ago, I designed and built a hive able to fit in one of my upstairs windows like an air conditioning unit. The bees can fly outside through a slot on the back of the hive, and the main hive is made up of two sheets of plexiglass with a wood frame. This means I can check up on the bees from the comfort of my home without having them loose in the house.
I had a lot of fun building my hive, and the bees have thrived in it - so much that they're starting to run out of room! So, I've decided it's time to build a new hive with the lessons I've learned from the first one. I'm hoping the improvements will make the bees even more successful, and unlike my current hive I even plan to harvest honey from the new one! One of the things I'm hoping to do is fully document my build to share it with everyone, especially my grandfather - hi Papa Paul!
My first step was to design the hive I plan to build in SketchUp, which is a program that lets me draw in three dimensional space, complete with measurements. I've saved a lot of wood by planning out what I'm going to build very carefully because I can make sure everything is going to fit and make improvements before I start cutting wood. Just like my current hive, the new hive will be modular, meaning I can pull out a frame full of bees inside the house without any bees getting loose. I call these frames "bee cartridges" and they work great, although they are time consuming to build! The design for these cartridges is very similar to the ones I've been using, but I'm making some improvements. Below you can see the design for the cartridge and the different cuts of wood I need next to it.
Last night I started building the first cartridge - I'll be making lots of these, because the hive will hold 10 of them. I'll also be making a larger cartridge for the top two slots that will hold "Flow" frames, but that's a story for another day. The first piece I cut is for the handle end of the cartridge, and it's the biggest piece.

The plexiglass windows will slide into this piece on the inside of the cartridge, so the next step is to use my table saw to cut a 1/8 inch wide slot on either side. Luckily my table saw blade is exactly 1/8 inch wide!

Next, I need to cut out the receiving hole into which the frame's hanging lip will fit. I did this with my chisel set - in the past I would use a screwdriver for this kind of cut, but the chisels make the job MUCH easier!
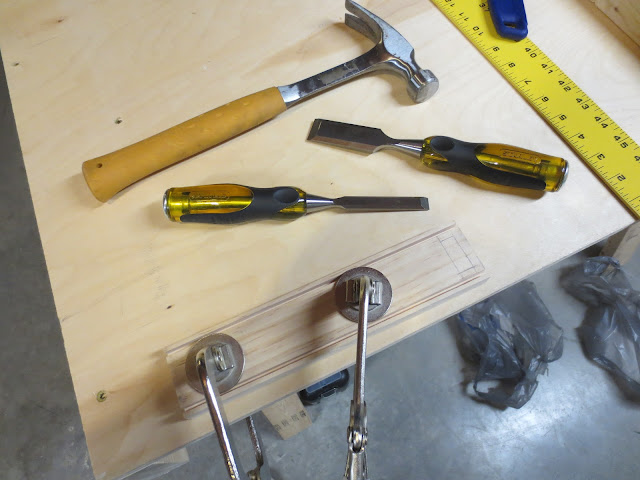
This is the first time I've used a proper set of chisels, but it went very well! The hole is perfectly rectangular and exactly 5/16 inch deep, just what I needed.

One of the things I noticed with my old cartridges is a lack of proper ventilation. To fix this problem I'm putting two mesh-covered vent holes in each cartridge. To make these holes, I'm using a 1.5 inch forstner bit.

I like forstner bits because they cut very quickly and leave a clean hole without the fuss of removing the cut blank from a holesaw. These holes turned out great.

Next, I cut the piece for the other end of the cartridge. It's a little narrower than the first piece, because this side will not have slots for plexiglass - the window will slide next to this piece.

This piece needs a half-inch wide, 5/16 inch deep lip cut into it which will hold the other side of the frame's hanging lip will rest. To do this I put my dado blade on my table saw.

To finish the cuts for the cartridge, I cut 4 pieces of long 3/4 inch wood. Two of these each will make the top and bottom of the assembled cartridge.

These pieces will hold the plexiglass windows on either side, and also will hold a strip of plexiglass used to close off the frame so the bees are locked inside the cartridge when I need to remove one. That means each of these pieces needs two 1/8 inch slots cut length-ways - I'm so glad I have a good table saw!

Now that I have all the pieces cut, I can start assembling the cartridge. Since there are so many small pieces of wood, I don't want to put this together using nails or screws. Instead, I'm using wood glue and clamps to make sure the cartridge is strong. To make this easier, I've secured a length of 2x4 on the tabletop which I can use as a brace when clamping glued pieces together.

This method of construction requires patience, because you have to wait at least a few hours after gluing each piece to make sure it cures in place. However, you don't have to worry about a screw torquing the pieces you're attaching around. With a flat surface and a good set of clamps you can join pieces very accurately

Another bonus of this method - if you run out of clamps you can screw 2/4 blocks right to your work table to keep pieces aligned while they dry!

To put the last two pieces in place, I cut several 5/16 shims to space them out properly. This means I could clamp everything in place while it dries and everything will be aligned properly.

One more picture of the last pieces glued, clamped, and drying:
In the next episode, I'll be finishing up the cartridge including plexiglass windows, venting mesh, and handle. After the first cartridge is done, I'll need to make about 11 more of them!
Hey man, just found your blog from reddit. This looks like a really cool project! Look forward to seeing it come to fruition!
ReplyDeleteThanks Liam, working on episode 5 now, I did a lot of work over the weekend.
Deletedid you finish it?
ReplyDeleteDiipendra@gmail.com